I just recently upgraded to an M2 Mac. I needed to print something not long after I set my new computer up, and — surprise! — our old Canon Pixma MX410 doesn’t work on the Mac anymore.
Canon has stopped supporting this printer entirely, and I guess Apple culled the printer’s driver from the kernel at some point. There was no Mac ARM version of the driver that I could find.
But all is not lost! Using CUPS and Linux, now I can print with my old printer from my new Mac — or even my iPhone or iPad. Here’s how I was able to turn my Raspberry Pi into a print server, and saved myself the trouble and expense of getting a new printer.
There are lots of great tutorials out there about setting up a CUPS server on Raspberry Pi OS, so I won’t go into exhaustive detail. This is really more about serving CUPS from inside my local network, using a real domain name and HTTPS, with Caddy as the reverse proxy.
In general, the process goes like this:
- Install CUPS and any additional printer drivers you need
- You can do this through Docker, but I decided to install it directly on the Rasberry Pi
- Add your user account (and/or the
piuser account) to thelpadmingroup- Any users who administer printers should also have a password and a home directory
- Install Caddy and create a Caddyfile
- I installed Caddy through Docker and configure it/start it all up via Docker Compose
- Depending on how you want Caddy to obtain TLS certificates, there may be additional setup here
- You’ll also need to open ports 80 and 443 to the computer hosting Caddy, so that can receive HTTP/S traffic. This will depend on your OS and firewall software
- Add the CUPS interface to your Caddyfile
- Point your domain name to the IP of the computer that’s running Caddy
- Restart CUPS and Caddy, and log into the web interface to add your printer!
Install and configure CUPS
On your soon-to-be print server, install CUPS. If you’re on Raspberry Pi OS/Raspbian: sudo apt install cups
Adding your admins/family members to groups that can access CUPS
By default, CUPS restricts certain administration actions to its own group, lpadmin. If installing CUPS didn’t create the group (check by doing cat /etc/group | grep lpadmin), you can add the group:
sudo groupadd lpadmin
Then, you can add your user accounts to it. For each user you’d like to administer CUPS:
sudo usermod -a -G lpadmin YOURUSERNAME
Modifying cups.conf
Finally, you’ll want to modify your /etc/cups/cupsd.conf to do a few things.
- We want the CUPS server to listen on all local interfaces. Or, at least, I do! For a couple reasons:
- It will be receiving traffic from the Caddy container in Docker, and Docker does so through its own network interface;
- My Raspberry Pi is on my Tailscale network, which is yet another network interface. If I need to access the CUPS interface remotely, I can, as long as the Pi and my remote computer/phone/etc. are on my Tailnet.
- Completely disable encryption. Normally, when you’re trying to access the CUPS interface, it wants to encrypt any connections to pages that require authorization (e.g. adding or deleting a printer) — even if you’ve disabled authentication! — so it tries to upgrade from HTTP to HTTPS. But we’re accessing CUPS through our Caddy reverse proxy, which already encrypts traffic. Since they’re on the same machine, we don’t need to encrypt traffic between CUPS and Caddy. So we disable encryption in CUPS.
(It honestly took forever for me to figure this out. I couldn’t get Caddy to accept the encrypted connection from CUPS — Caddy would just throw a 502 error and CUPS would go into an infinite loop of attempting to upgrade the connection and redirecting. So I gave up and disabled encryption entirely. If you know how to handle this properly, hit me up. I’d consider tackling this again if e.g. CUPS lived on a different machine from Caddy and they needed to talk over the network.)
The cupsd.conf file is used to set up all the rules for access to the interface, but also things like: can users cancel others’ print jobs? Which users can add printers? It’s pretty powerful! Mine is very barebones though. I just allow all local network traffic and let CUPS decide when to require authentication.
Here’s what it looks like, with some comments to make it a bit clearer:
LogLevel warn # Changing this to "debug" and doing "tail -f /var/log/cups/error_log" was the only way I figured out why I couldn't do administrative actions.
PageLogFormat
# Specifies the maximum size of the log files before they are rotated.  The value "0" disables log rotation.
MaxLogSize 0
# Default error policy for printers
ErrorPolicy retry-job
# Listen on all interfaces and a socket at port 631.
Listen /run/cups/cups.sock
Port 631
ServerAlias DOMAINNAME # This should be whatever your desired domain is that Caddy will route traffic through.
# Show shared printers on the local network.
Browsing On
BrowseLocalProtocols dnssd
# Default authentication type, when authentication is required.
DefaultAuthType Basic # This refers to basic HTTP auth, but you can get fancy with single sign on or whatever. You can also completely disable it by changing it to "None".
# Completely disable HTTPS encryption so we can properly talk to Caddy.
DefaultEncryption Never
# Enable web interface.
WebInterface Yes
# Only local users (that is, users on my network) can access any CUPS interfaces.
<Location />
  Order allow,deny
  Allow @LOCAL
</Location>
<Location /admin>
  Order allow,deny
  Allow @LOCAL
</Location>
<Location /admin/conf>
  Order allow,deny
  Allow @LOCAL
</Location>
<Location /admin/log>
  Order allow,deny
  Allow @LOCAL
</Location>
Code language: PHP (php)
Once you’ve modified your configuration, you can restart CUPS: sudo service cups restart (if you’re on Debian/Raspberry Pi OS).
Install and configure Caddy
A quick note about DNS
DNS is beyond the scope of this blog entry, but it’s worth noting that you’ll need DNS pointing at the IP of the machine that Caddy is running on.
You could use public DNS for this. I didn’t want to have a public DNS entry pointing at my local network, though, so I used the DNS server that comes with PiHole. PiHole acts as a local DNS server, so I created an entry in the PiHole interface that points my domain to the IP of the computer running Caddy.
Without DNS, you won’t have the ability to use a real web address to access CUPS; you’d have to use your CUPS server’s IP address, and its port, which defaults to 631. You’d also have to open port 631 on the computer running CUPS.
I’m using Docker and Docker Compose to run Caddy.
Dockerfile
I’m using the Cloudflare DNS extension for Caddy, so I have to use a custom Dockerfile to build my Caddy container.
This extension enables Caddy to retrieve HTTPS certificates without exposing my IP to public DNS!
If you don’t care about a proper HTTPS certificiate, or if you already have one, you could just use the default Caddy image in your docker-compose.yml.
FROM caddy:2-builder-alpine AS builder

# The caddy build tool can retrieve an extension for you. Nice!
RUN xcaddy build \
    --with github.com/caddy-dns/cloudflare

FROM caddy:2-alpine

COPY --from=builder /usr/bin/caddy /usr/bin/caddyCode language: Dockerfile (dockerfile)
Docker-Compose
And here’s my docker-compose.yml:
---

version: "3"

services:
  caddy:
    build: . # Build the container found in the local Dockerfile; change this if you want to build from the plain Caddy dockerfile.
    restart: unless-stopped
    ports:
      - "80:80"
      - "443:443"
      - "443:443/udp"
    volumes:
      - ./Caddyfile:/etc/caddy/Caddyfile
      - caddy_data:/data
      - caddy_config:/config
    networks:
      - caddy # I put Caddy on its own network but you don't really have to
    extra_hosts:
      - host.docker.internal:host-gateway # This gives us access to the host network, so we can forward traffic to localhost:631, where CUPS lives
volumes:
  caddy_data:
    external: true
  caddy_config:

networks:
  caddy:
    external: true
Code language: YAML (yaml)
Caddyfile
Finally, here’s my Caddyfile.
This is a bit truncated as I actually build the Caddyfile via Ansible, and I’m hosting several services at home.
Also, the domain name setup is specific to me — I have a wildcard certificate for my local subdomain.
{
    email [email protected]
}


*.local.my.domain, local.my.domain {
    tls {
        # Cloudflare API key used to use DNS to verify domain ownership and obtain HTTPS certificates. You can get this from their interface.
        dns cloudflare CLOUDFLAREKEY
    }

    @cups host printers.local.my.domain
    handle @cups {
        # Point this domain at the host's port 631
        reverse_proxy http://host.docker.internal:631  {
                # Probably unnecessary! CUPS checks the Host header, not these two.
                header_up X-Real-IP {remote}
                header_up X-Forwarded-Proto http
            }
        }
    }
}Code language: PHP (php)
Start CUPS and Caddy
From the same directory that has your Docker Compose file, you can run docker compose up -d to start Caddy. It may take awhile, if it’s the first time Caddy is retrieving TLS certificates for your domain.
And, from anywhere, you can run sudo service cups restart (or sudo service cups start if it wasn’t running before).
If you’ve pointed your domain name at your Caddy server, you should be able to access CUPS from within your network!
Adding a printer to CUPS
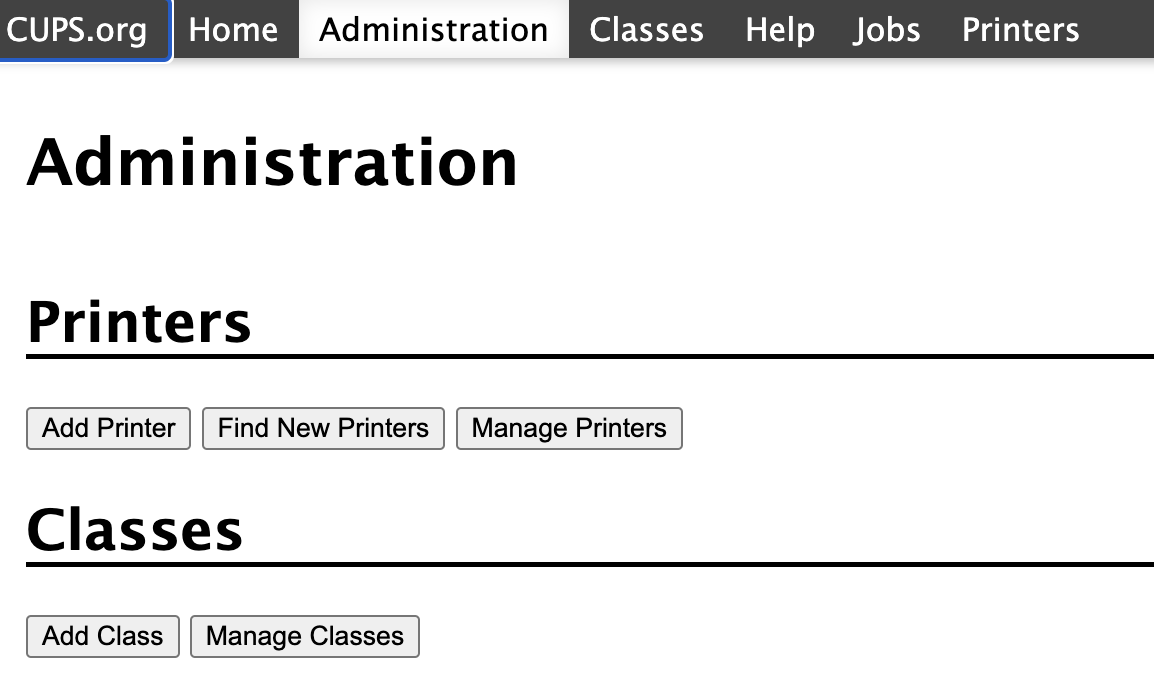
Adding a printer to CUPS is pretty easy. You’ll click “Administration > Add Printer”:
When you click “Add Printer”, CUPS will search for printers. In my case, it found the Canon MX410 advertising itself on the network — no direct connection required:
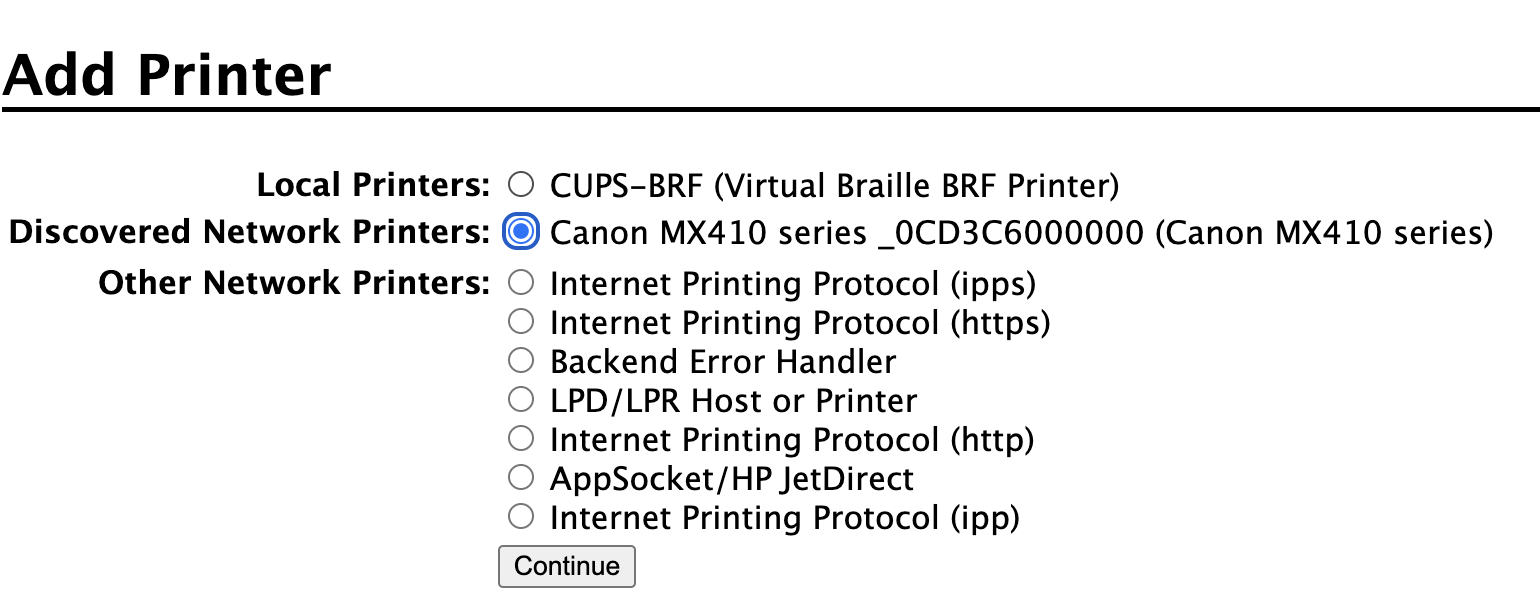
When you click “Continue”, you can enter a name and description of the printer you selected. You can click “Share This Printer” to make the printer available to your whole network — even iOS devices!
The next screen lets you select a print driver. It automatically suggested mine, but your mileage may vary. If you don’t see your printer, it might be available as a separate package.
Finally, when you click “Add Printer”, it should add the printer to the list of available printers.
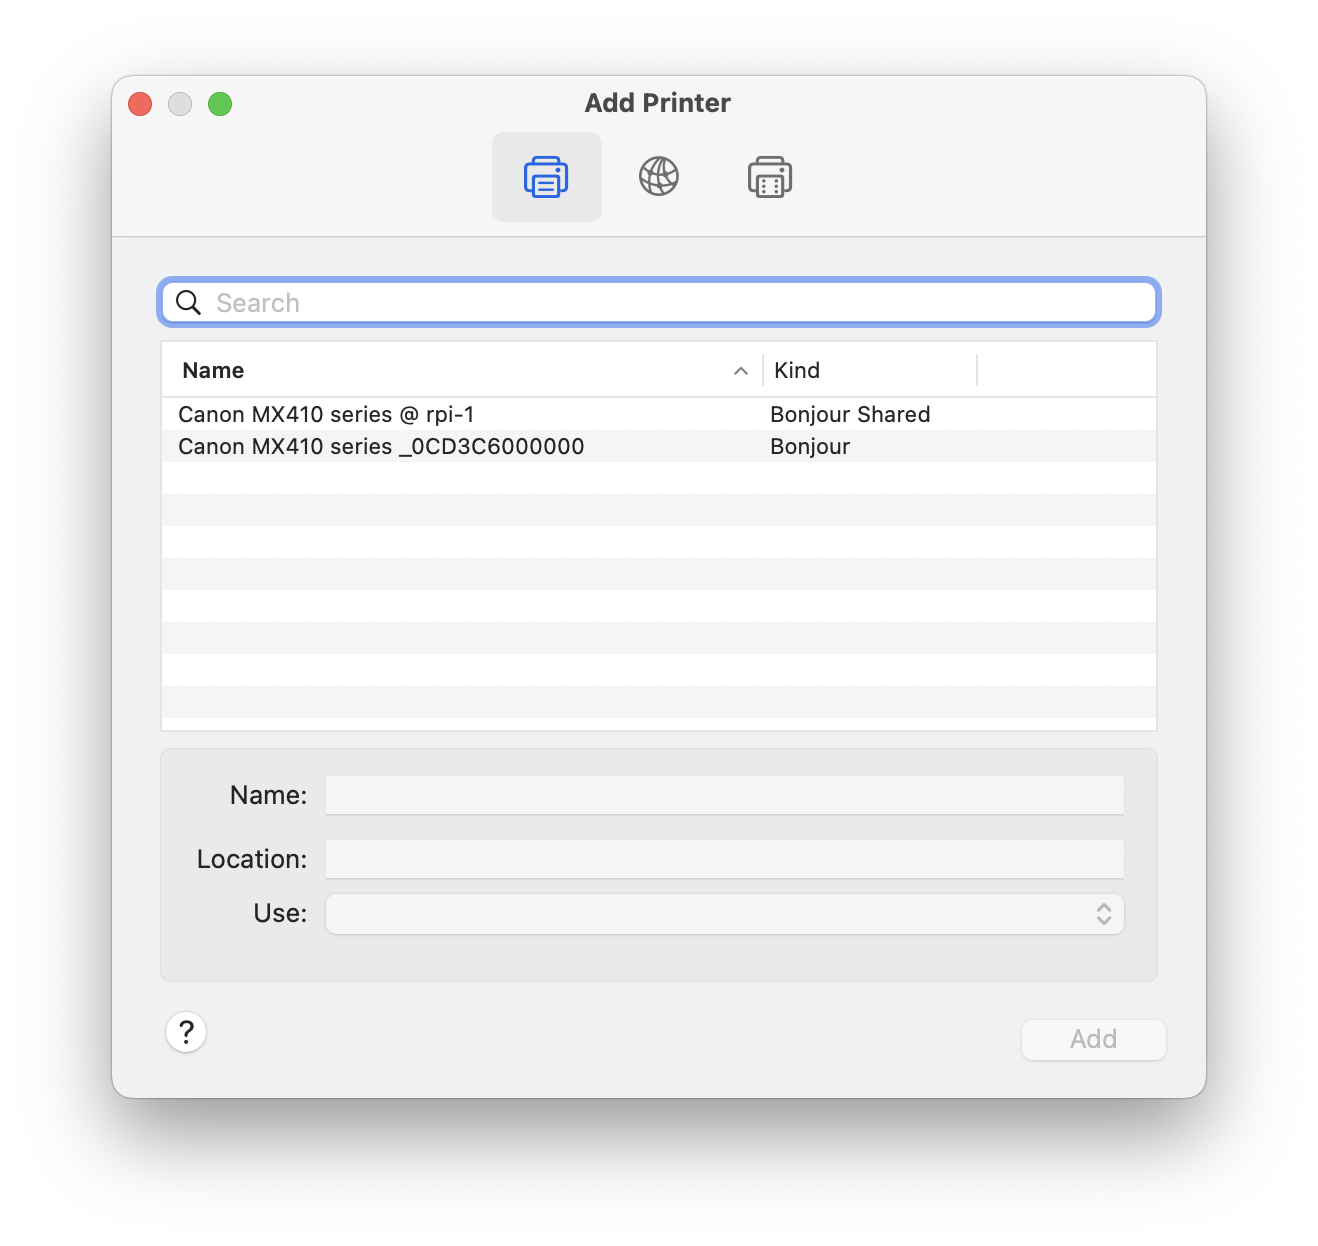
On the Mac, if you open Settings and click “Printers & Scanners”, and then click “Add Printer, Scanner, or Fax Machine”, you should see your printer!
Donezo
That was a fun rabbit hole! And now I can doodle notes on my phone and print directly from it. Neat!